4.1.5 Dimensions
and Shrinkage
The primary goal when forming the green
body from unfired ceramic material is to come as close as
possible to the final dimensions and shape of the product
to be manufactured, since machining after sintering is costly
due to the very high hardness of the material.
In contrast to metals, the forming of ceramic parts is not
the last step in the process chain, but rather almost at the
beginning.
The green body for the ceramic product must
be formed larger than the final dimensions, since one of the
particular properties of ceramic technologies is that almost
all materials experience a reduction in volume during the
manufacturing process. This is due to volume loss during process
steps such as moisture removal, drying and firing.
The actual ceramic material and its characteristic microstructure
are not created until firing, making the desired material
from the mixture of raw materials.
The high temperatures lead to a reduction of the specific
surface area of the particles (diffusion processes, the creation
of liquid phases, phase changes) and thus to compaction of
the microstructure. This is associated with a reduction in
volume, and is called shrinkage. For this
reason, moulds or dies must be "over-dimensioned"
with respect to the desired geometries, in order to compensate
for the shrinkage that takes place during processing.

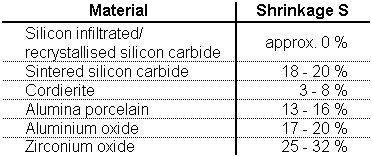
Table 6: Longitudinal shrinkage of some materials
After the mould has been filled with a measured
quantity of material, even very slight variations in the density
of the loose granulate being pressed have the effect that,
in pressing, the unfired parts compact to a variable degrees,
with the result that the degree of shrinkage occurring during
sintering varies.
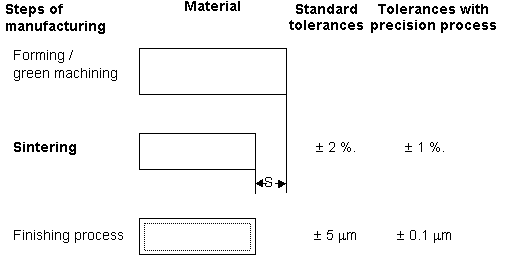
Tolerances in the linear dimensions of sintered parts using
standard processes are therefore approximately ± 2
%, despite density variations and high shrinkage. These standard
tolerances are specified in DIN 40 680 . The use of optimised,
synthetic powders or working materials along with highly developed
process control nowadays permit tolerances of < ? 0.5 %
to be guaranteed.

Figure 61: Dimensional tolerances
after sintering and after hard machining
In contrast to the usual procedure with
metallic materials, all dimensions should be given the widest
possible tolerance ranges in order to avoid increased manufacturing
costs. Above all, particular stress must be placed on the
need for the user to limit close tolerances to whatever is
absolutely necessary for the function of the ceramic part.
|

